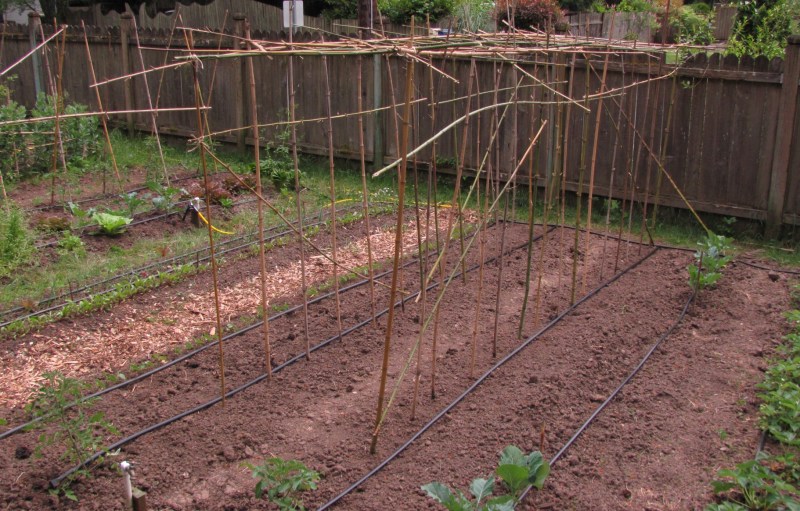
Just as the last bed gets dry enough to cultivate I have to start to worry about watering. It’s the May transition, and this year we are now past twenty days in a row without rain, so getting the watering going is more urgent than usual.
There are as many ways to put together a drip irrigation system as there are gardeners. It’s taken me a couple of years to develop a system that works for me. My criteria for a suitable system include ease of installation, flexibility, watering effectiveness, and cost. The first couple of years I used drip watering, I went to the local garden store and got large and small drip line, lots of little drip devices, and compression barb fittings to put it all together. What I discovered was that for wide beds it took lots of little drippers to get adequate coverage. The drip system became a web of big and little tubes with lots of little drippers everywhere. It did the job, but it took a lot of work to put it all together, and when plants were removed, the drippers were in the wrong places. In the fall when the garden needed to be cleaned up, the drip had to come down and we would start the whole process again the next spring, now with drip pipe where none of the drippers were where you wanted them.

Two things have changed the way I do things now, T-tape and removable fittings! Much of how you arrange your drip irrigation will depend upon how you garden. I garden in rows, so a row-based drip system works well for me. The basic approach is to build a main manifold at the ends of the rows in the garden with standard 5/8 drip tube. Then irrigate individual rows with T-tape regulated drip line. The T-tape doesn’t like to go around corners; instead row-length sections are run off of the main manifold.
The exception to T-tape is for widely spaced plants such as tomatoes, winter brassicas, and individual plants like blueberries or artichokes. These plants do well with standard drip line and individual drippers at each plant. If you are really together when you plant these crops, you will lay last year’s previously drippered drip line first and use the location of the drippers to determine the planting locations. If your garden rows are all roughly the same length, you can make up “tomato-spaced” and “broccoli-spaced” drip lines that you can use from year to year, coupling into the row-end manifold as you would with T-tape lines.

This modular approach makes reuse and installation easier. The key to ease of reuse are the removable fittings. Push-on compression fittings are very difficult to remove. They are less expensive than the “Easy Loc” fittings that I like, but the economics of reuse and lack of frustration make removable fittings well worth it. Overall, the cost of a T-tape installation is less than half the cost of using tubing and individual drippers.
For a T-tape system you need to regulate the pressure of the lines down to 10 PSI with an in-line regulator, and you need a filter to keep the water clean to avoid plugging the T-tape drip channels. There are a couple of tricks I’ve discovered after using this stuff.
 The little rib on the T-tape that creates the drip channel tends to make the fittings leaky. The leak at the twist-loc fittings can be stopped by tightening the fitting with pliers. At the end of the line, you use a little flat plastic sleeve to hold in place the folded over T-tape. A single fold always leaks, two folds won’t.
It’s handy to have a few twist-loc couplers for main drip line and for the T-tape to repair damaged sections or to be able to break a section of line to rototill and then put it back together again. Turns out that T-tape and main drip line is close enough in size that the twist-loc couplers can connect the two formats together. This has proved to be handy more than once to connect a section of individual drippers on the end of a T-tape feeder.
The sun can shine now and my garden won’t dry out!

I’ve never used an irrigation system before (just a couple of drip hoses now and then), so I find this post very intriguing! As my garden expands, I’m probably going to have to automate the watering, and I like seeing what you’ve learned. Thanks!
Part of the attraction of drip is that it sips water and lets the weeds dry out.
Seems as this was the weekend for installing drip irrigation. Being that our soil is very sandy , drip systeis a must. we dry out very fast. I find it very easy to over water, as the water drains very rapidly. thats when a timer comes in handy. Short little tmmings threw out the day on hot days. Sometimes it’s hard to regulate how much water is down there. Alot of the times I’m amazed on how soaked the soil is at the end of the year. 2 , 3 feet down . It takes some fine tuneing to know how much to leave on. but when you have it down, It sur beats holding a hose.
Yes it is tricky to know just how long to leave the water on, and how far the drip zone spreads. Occasionally you have to dig and see!
I am currently using soaker hoses for my raised beds. I always enjoy reading about other systems. I’m always looking for something better or more effective. Adding your blog to my reader.
We laid out our drip lines for the squash and tomato beds and then planted them accordingly. We also found that when some of the lines break we will probably do a few things differently. Live and learn I guess. :)
Hi Robin, I checked out Farm Folly. You garden looks so nice! I wish I had a nice sunny spot like that. I bet things grow well there!