
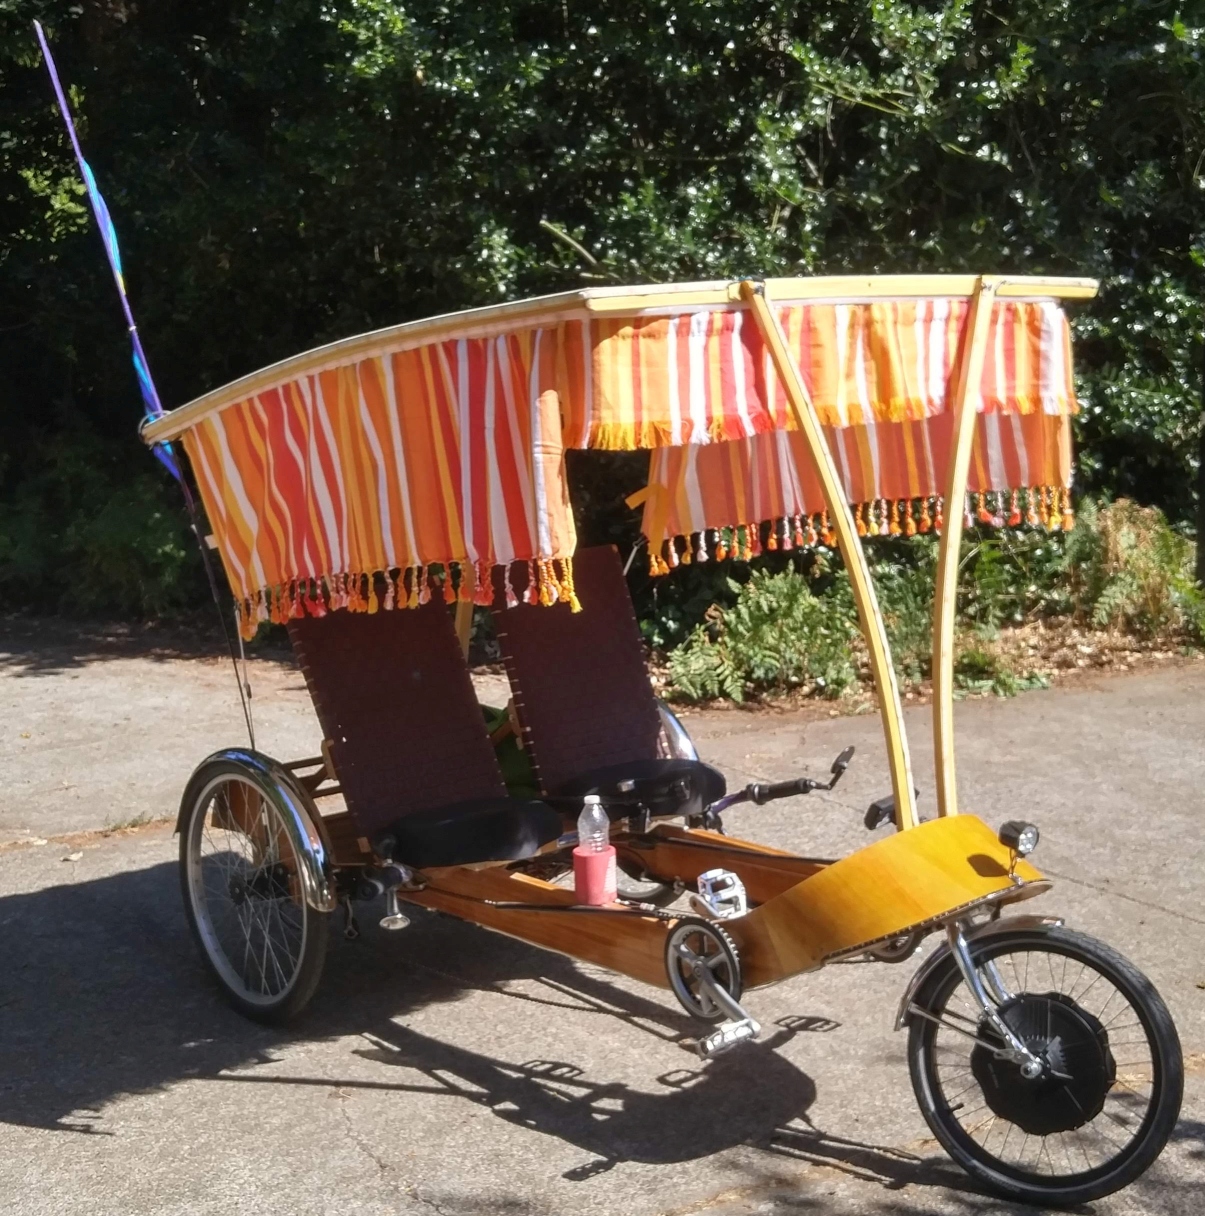
With Burning Man in the future, the DateTrikE needed to be off the grid, the trike’s cloth canopy to be replaced with solar panels. This is all mildly expensive, so I wanted the solar canopy to be able to do double-duty as solar for our RV. The canopy needed to be lightweight but still robust. I settled on a pair of Renogy 175W flexible solar panels. The panels themselves only weigh about 6.2 lbs. each and are almost 5 feet long and a little more than 2 feet wide. Two panels side-by-side are perfect for the trike’s canopy.
As with everything DateTrikE, the panels needed a wooden frame to support them. The panels can easily be applied to surfaces curved in one dimension. I was looking for the panels to sit up high enough in the front to allow for good visibility and then curve down in the back to provide good shade and just give satisfactory head room for the passengers.

Building Glue-lam Beams
Let me pause here and describe the construction technique that leads to a fairly-ridged lightweight structure made from wood. You are always up against the question of weight versus strength. It turns out that fine grained old growth Douglas Fir does pretty well in this regard. With this in mind I went to the lumber yard to the clear fir section to pick out some boards. However, premium vertical grain clear fir was going for $135 for a single 12 ft. 1 x 6 board – which was just crazy! Instead I walked over to the construction lumber and picked through the 1×6 x 12′ #2 & better stock. I was looking for a couple of light, fine grained old growth boards, usually flat sawn in the wider dimensions. They were not as pretty as the clear lumber but were only $9 each. A few knots didn’t matter much because the next step is to cut up the boards into thin strips, the knotty sections not used.
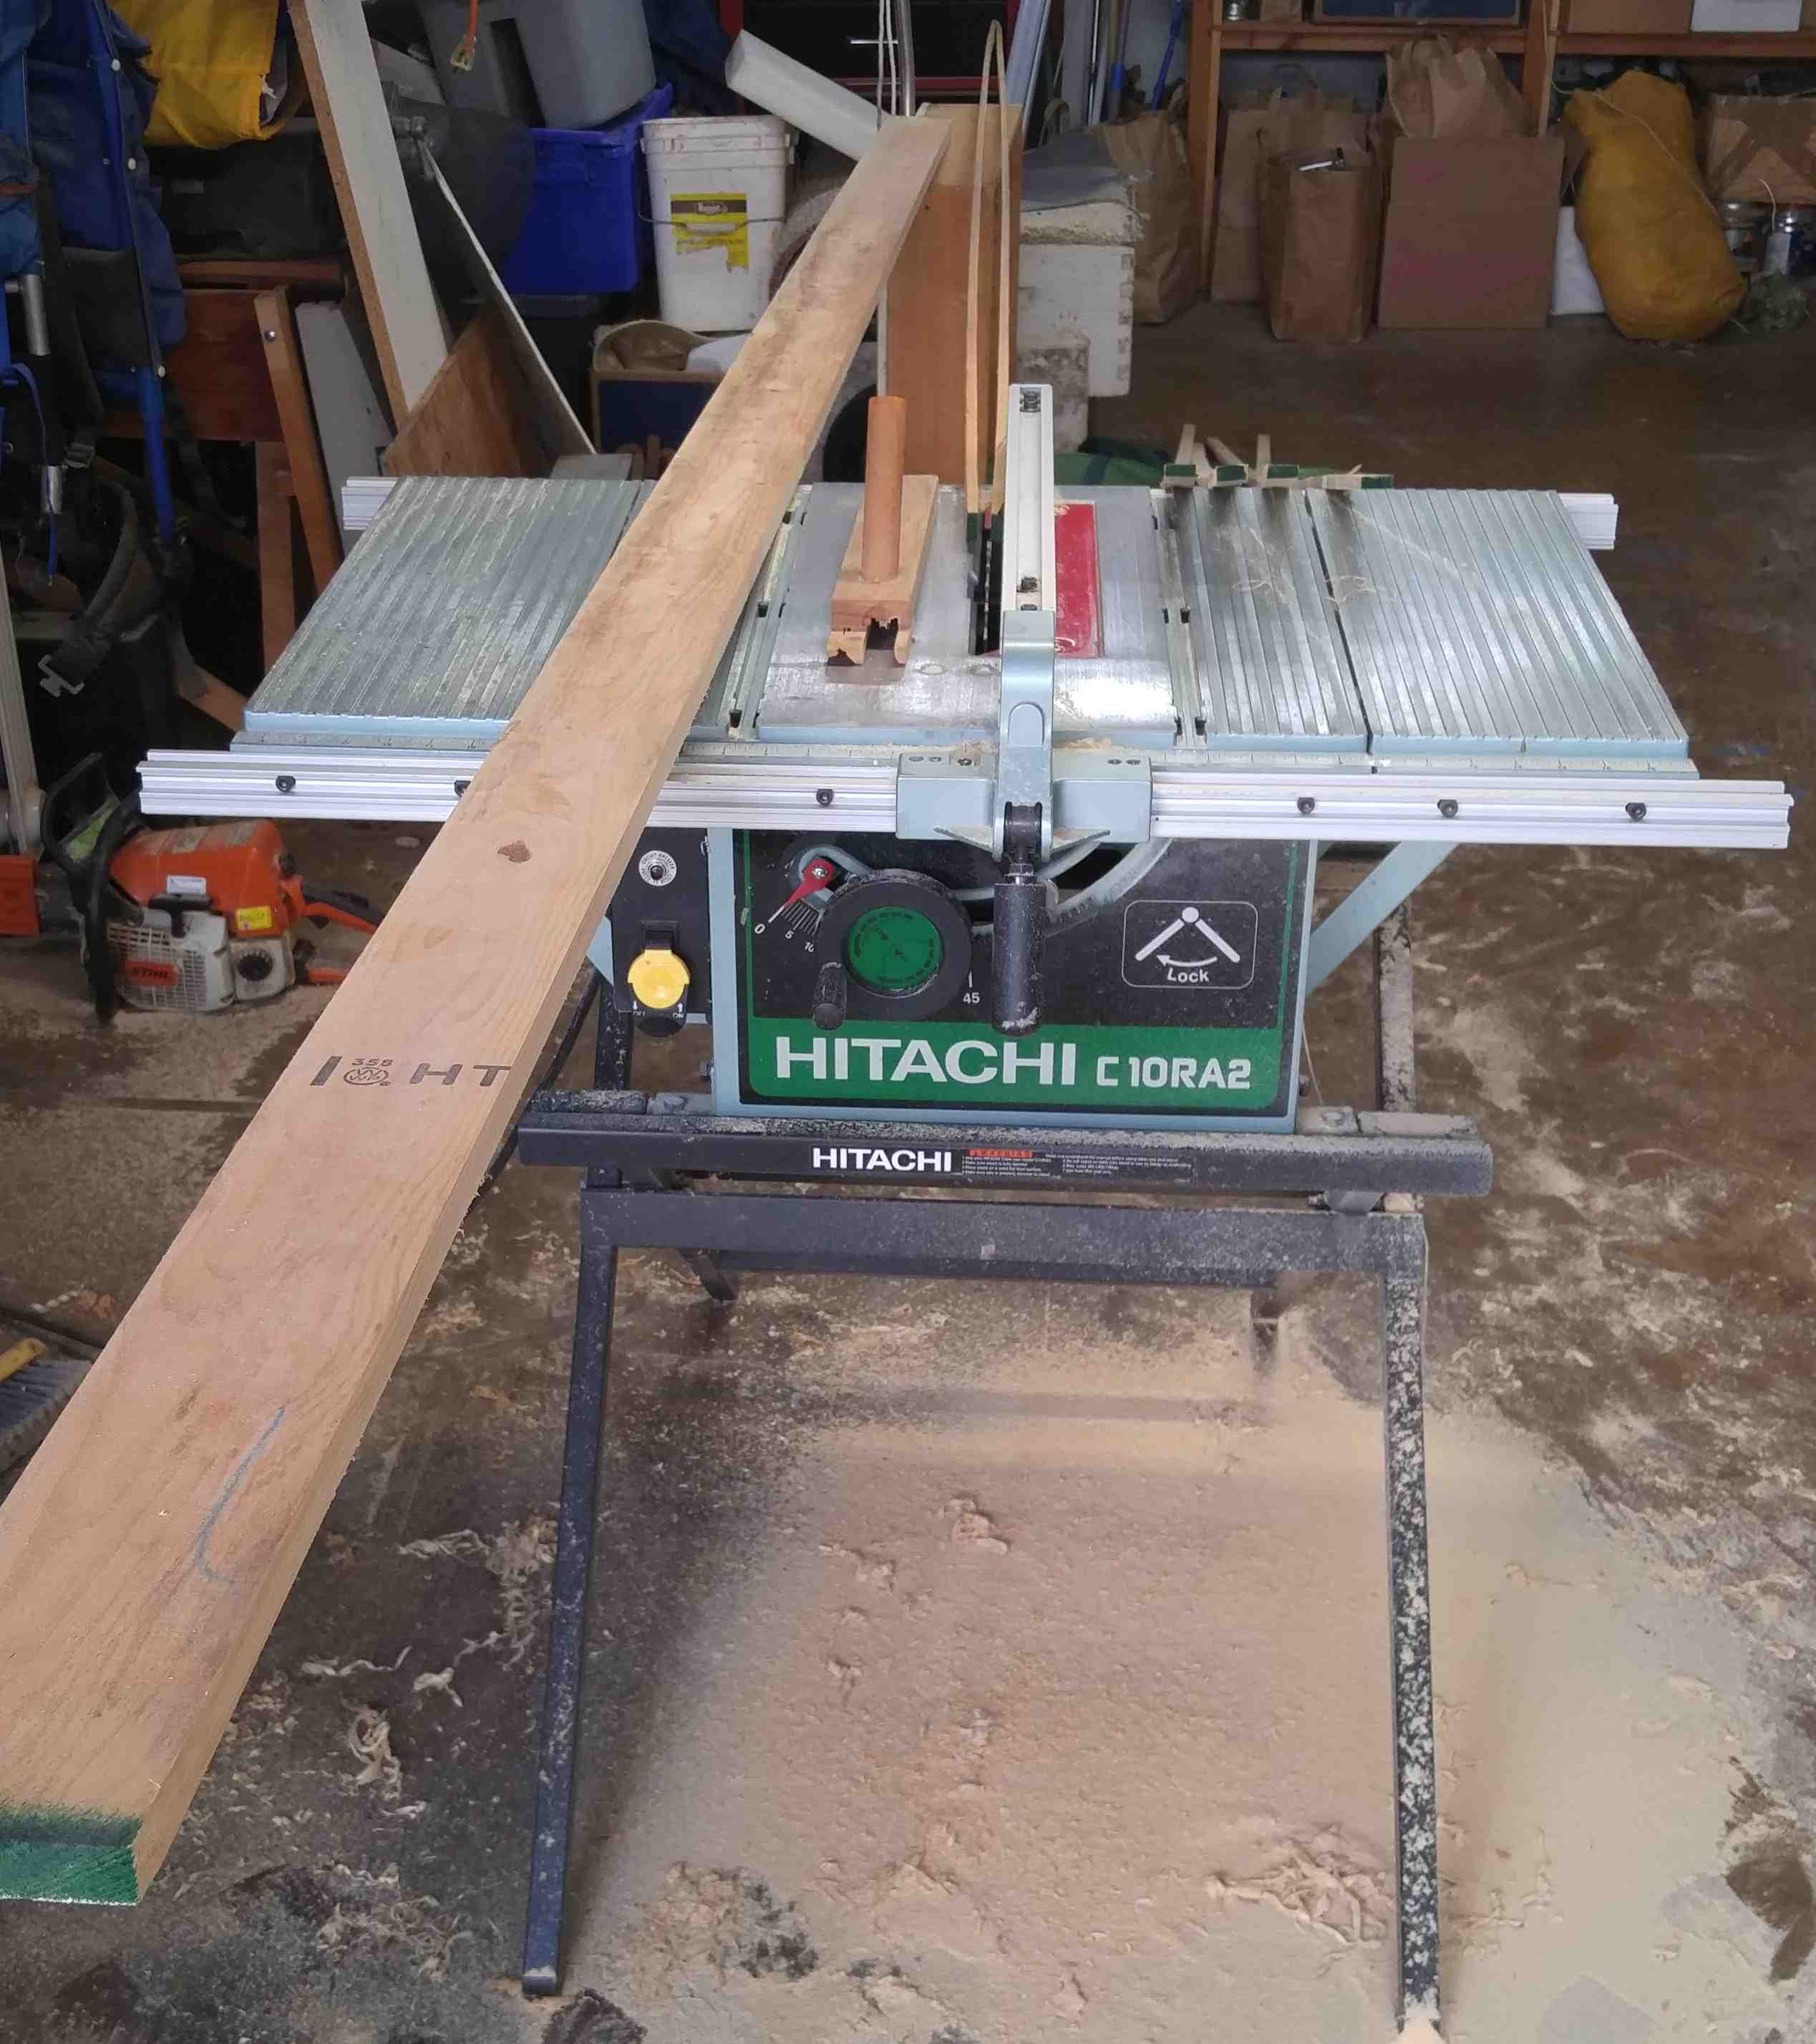


The production steps are illustrated in the photos above. First you have to rip your nice boards into strips. I did this by first ripping the flat sawn lumber into 3/4 x 3/4 (plus a little to allow for clean-up) strips, and then ripping those strips in half so I ended up with 5/16 x 3/4(+) strips for gluing. A table saw with a carbide blade, carefully aligned rip-fence, a catcher for the boards as they leave the saw, and a ‘pusher’ to safely push the board past the blade will all make the work go smoothly and safely.
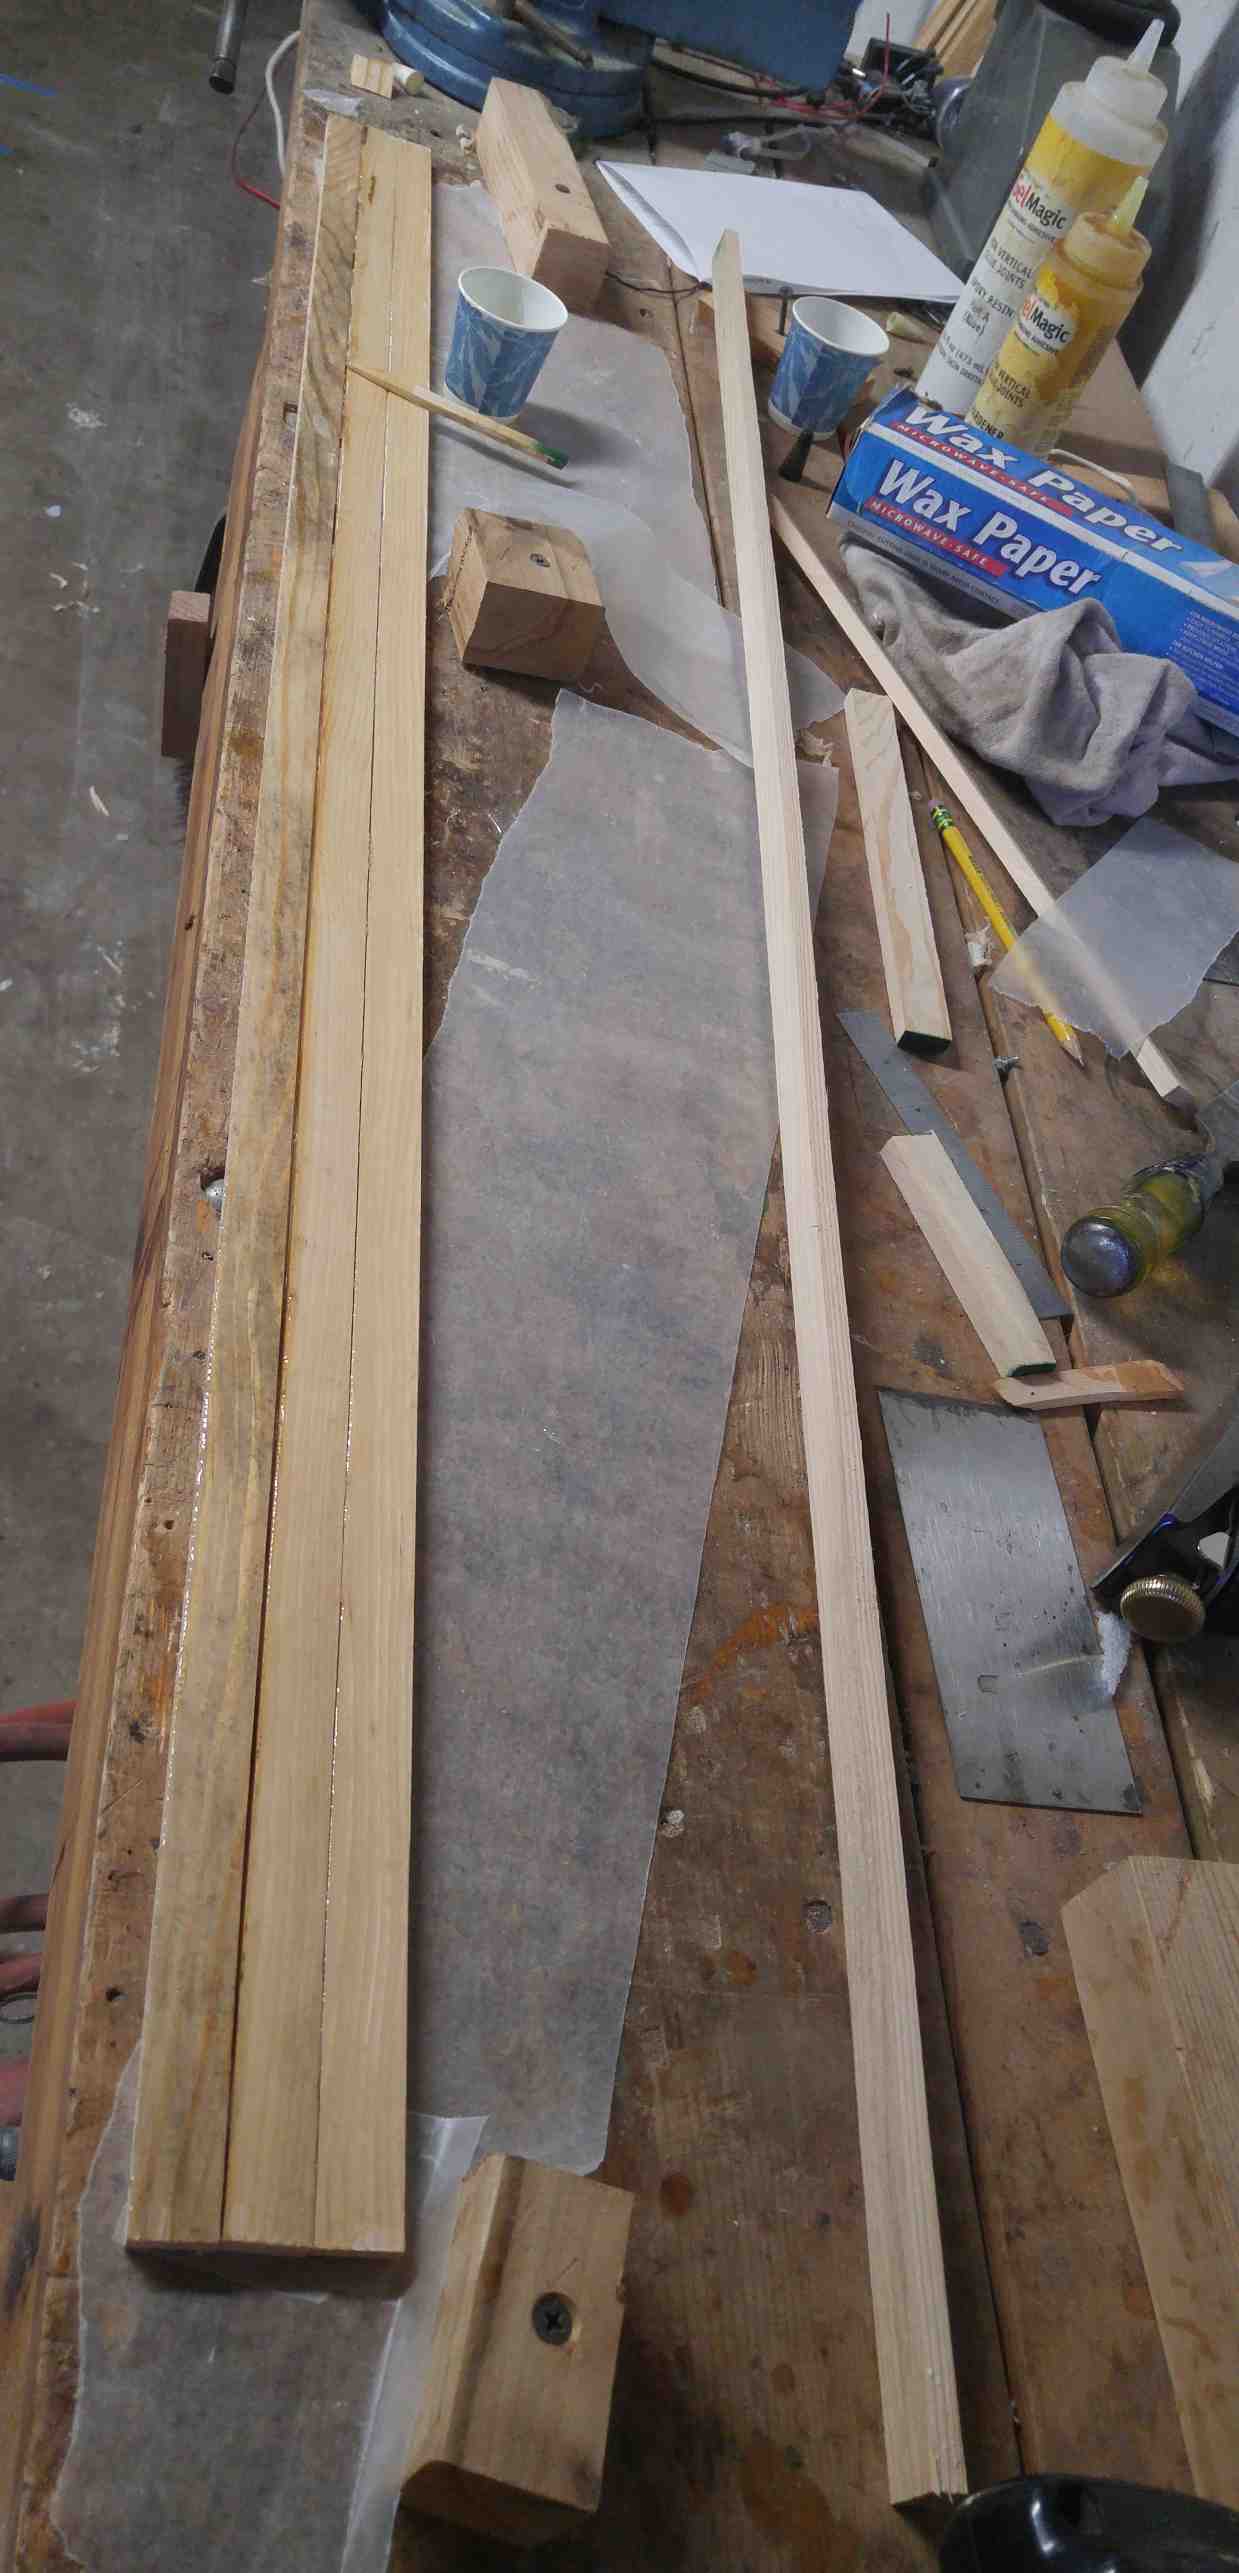
Generating the curved beams merely requires three blocks screwed to the gluing bench to force the beams to take the particular curve that you have in mind. The glue bench should be pretty flat and without any old dried blobs of glue on it. I use wax paper between the work and the bench to keep from gluing the work to the bench. There are lots of glues that will work, but my favorite is System 3 “GelMagic” two-part epoxy designed to be sag and drip free for vertical joints with good gap filling properties. This is a totally waterproof marine epoxy and will give best results if you measure the ratio accurately and mix well. I spread the epoxy liberally on one surface of the intended joint, placing several strips next to each other to facilitate spreading an even layer of glue on the strips. Then I stack them all together and spring the gluey assembly into the blocks on the glue bench and press them all down firmly onto the bench to make sure that the strips are all even with one another. Finally, I add a few clamps with just enough pressure to cause the glue to flow out of the joint.
It is best to do the gluing in the evening and then let it sit over night for the glue to cure. Epoxy goes through a “sticky” phase where the joint will not come apart but the glue is not yet hard. If you release the glue-lam beam from the blocks too early, the beam will straighten it self out again, and you don’t want that! When you finally remove the clamps and pop the beam off of the blocks it will relax just a little. You want to glue up all of the beams requiring the same curvature before you remove the bending blocks from the bench.
When epoxy is about a day cured, it is the best time to clean it up with a plane. The “green” epoxy will cut easily with the plane, whereas in a few days it will be more recalcitrant. A sharp plane blade, a flat work surface, and a little practice and you will be making pretty shavings and flat boards. There is little in wood work more satisfying than cleanly peeling away thin shavings, revealing the wood’s beauty within.
You can increase the overall stiffness of a structure if the surfaces are prestressed in two dimensions “just a little”. After I had made the curved rafters, I tested how much of a bend I could simultaneously get in the other direction by propping up the middle rafter compared to the ones on the edges. It was only a few millimeters, but I think the effect adds to the overall strength and the grace of the design.
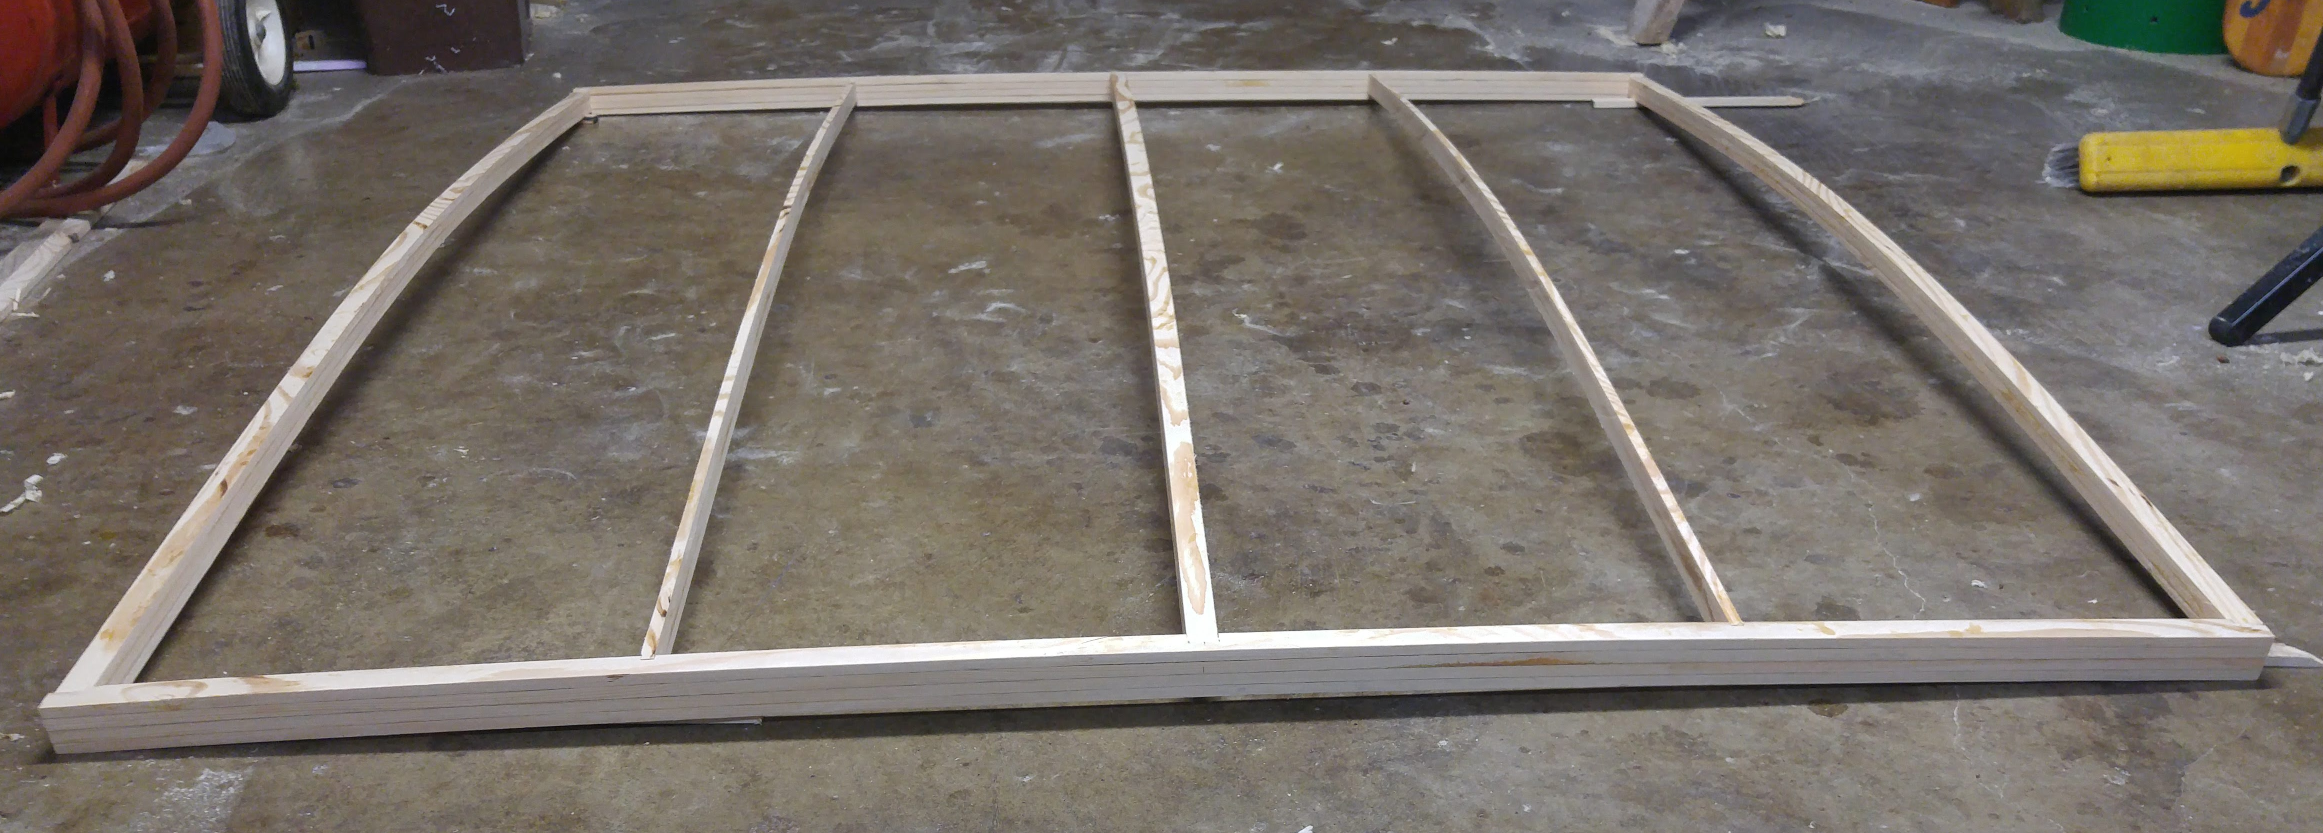
With all of the curved beams built and cleaned up, I cut everything to size to fit the panels. There were grommet holes in the panels that are meant as hold-down points. In some instances I needed to add corner gussets or additional pieces of wood strips to allow for fasteners at the grommets. All of the panel edges are supported with the full 3/4″ wide beams, but the center rafter for each panel is one of the 3/4″ beams cut down the middle. I provided 1/8″ dadoes in the end headers to locate the rafters and strengthen the glue joint.
Applying the Solar Panels
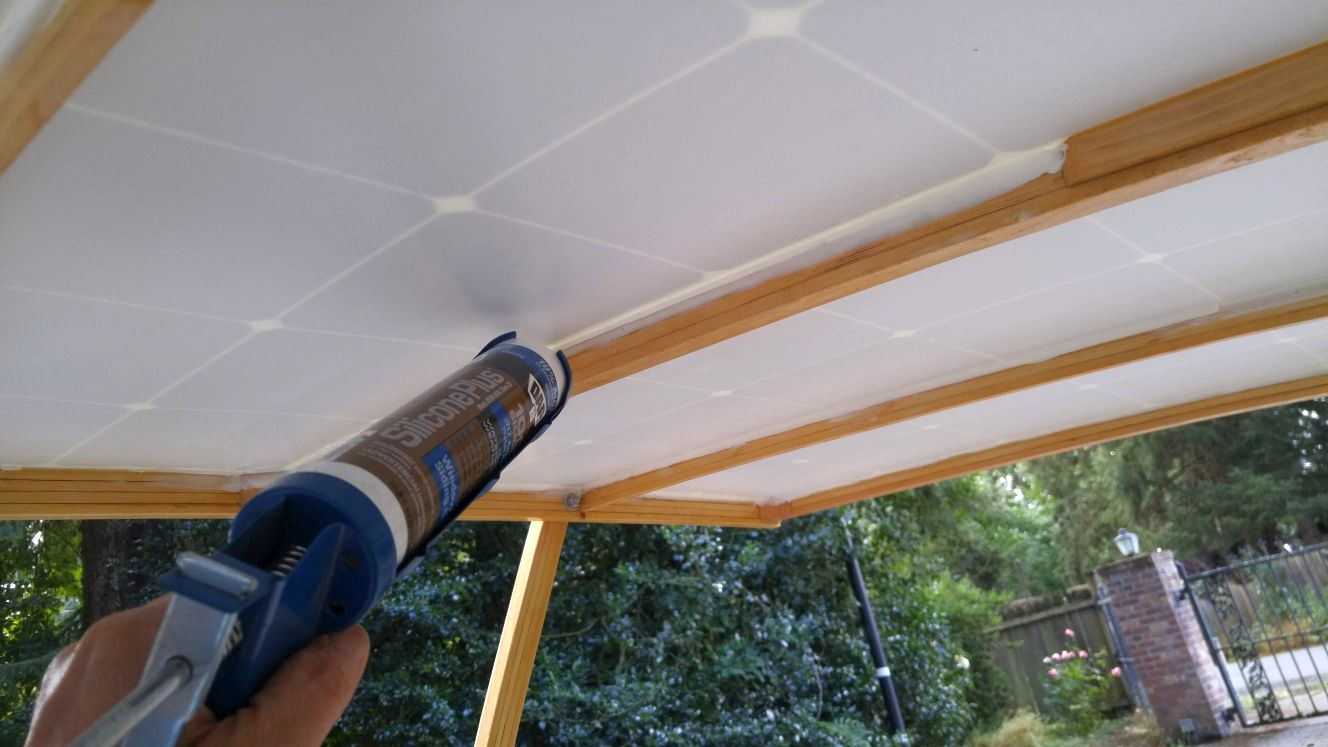
I fastened the panels to the frame using flat head wood screws through the six grommet holes on each panel that are provided. This held everything in place and allowed for some height position tests and a couple of road tests. The road tests revealed that the panels liked to slap against the frame on bumps, so it was clear that then needed to be glued down as well. After giving the frame a couple of coats of spar varnish, I put everything back together and used silicon caulking adhesive along all of the rafters.

Charge Controllers
When it was time to hook everything up, I needed a charge controller that would get me the most power from the panels and step up the output to the battery voltage. There were a couple of small inexpensive Chinese controllers on e-bay that had promise. I ended up using the one recommended by the Grin folks, the Eljoy step-up MPPT controller. This controller allows you to set the maximum output voltage to whatever you would like. Once the battery reaches that charge state, the controller will no longer give it any more current.
When I ordered the charge controller, I made a mistake and first placed an order for the Eljoy step-down version. That wasn’t going to work for the trike, but has proven to be very handy to charge the RV house battery using the same panel.
The panels are set up to produce about 20V on each one. I had the choice to either connect them in series or parallel. The main advantages of the series connection is simplicity, lower total current on the output wires, and a closer match of my 48V battery so the charge controller doesn’t have to do much work on the step-up. The main advantage of the parallel connection is that a partially shaded panel will not restrict the output of the other panel if it is in full sun. A rather small amount of partial shading can degrade the output substantially. Nevertheless, I went with the series connection.
A Fringe on Top
The last item to complete our trike to be ready for playa sun was to come up with some kind of curtains to help block out a little more of the bright desert sun. This is another one of those details where there is no clear simple ready-made solution where you think maybe there should be. Eventually I decided on a length of 1/2″ polyethylene tubing for the curtain track. I slit the wall of the tubing the entire length and nailed it every few inches through the slit to the underside of the solar panel frame. A trip to the animal-charity-thrift-store at the end of our street provided us with a fringed “beach blanket” that had just the right look for our surrey with a fringe on top. Not my usual tools, but an ironing board, fabric scissors, needle and thread, and some careful handwork allowed the curtains to emerge. Ellen had some ugly old beads that could slide down the tube. I used some 80 lb testTeflon impregnated braided fishing line to sew the beads to the fabric every couple of inches. The beach blanket came with a couple of Velcro straps that I repurposed to be able to tie the side curtains back.
The panels work very well. In good sun they will easily produce 250W, topping up the DateTrikE’s battery in short order. At Burning Man last week, we put more than 100 miles on the trike scampering around the playa. The photo below shows us tricked out with our playa gear, the “dust bunnies” hanging on to the rear supports, the canopy curtains tied back for the expansive evening playa views.
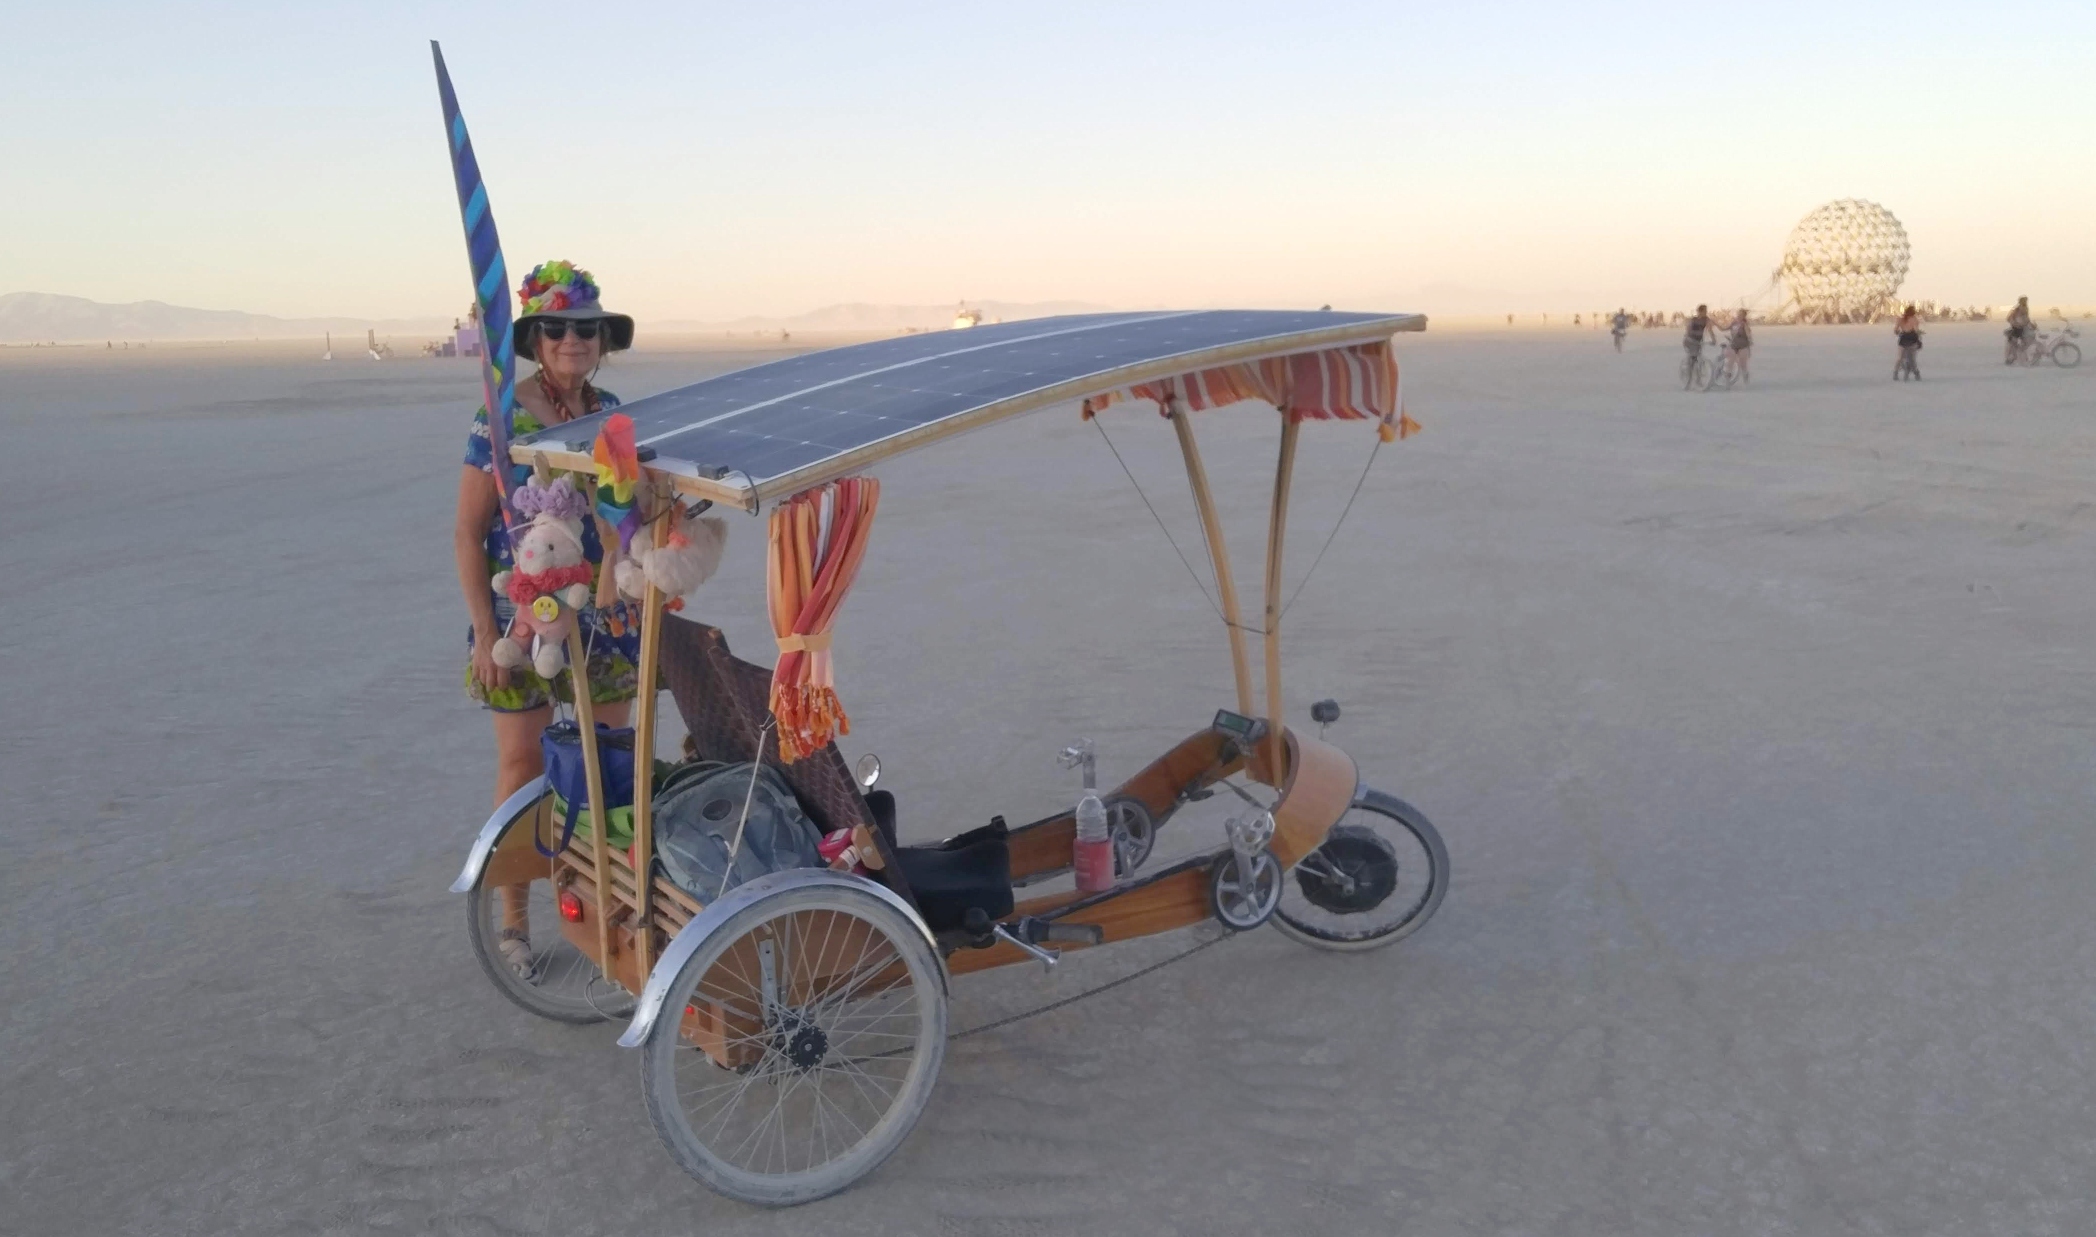

JOY here on the solar-shade/scoot articulation of the DateTrikE’; not to mention the desert- flair hanging of the dust bunnies
So great to see the solar panel upgrade. We wound up buying an older Worksman side by side tandem trike. It’s heavy and 3spd, but a guy from Recyclized in Eugene installed a Tongsheng mid drive motor, with torque sense pedal assist, and that definitely helps. I wish I’d gone with the front hub, though. Feels like extra wear and tear on the rear drive mechanism.
Hey, you got something! I’m sure you will have fun with it.